Integrating OpenPix with Magento1
Pix Plugin for Magento1
Summary
This document details steps required to connect your Magento1 based e-Commerce platform to OpenPix. The OpenPix platform performs the reconciliation between your Bank and your e-Commerce in real time. After connecting your OpenPix account it is possible to charge customers in real time with QrCodes Pix, send Payment Links, manage charges including refunds.
Note: This document expects you to already have an active Magento1 environment.
 Download OpenPix Magento1 Plugin - versão 1.7.1 - Current Version
Change Log
1.7.1 - 15/09/2023
- Send customer address on charges.
1.7.0 - 12/09/2023
- Implemented 1click v2, a button that redirects the user to our platform with the webhook URL and AppID already prepared.
1.6.0 - 17/08/2023
- Removed giftback, which was causing bugs.
- Rename Pix Parcelado to OpenPix Parcelado.
1.5.0 - 31/07/2023
- Implementation of OpenPix Parcelado Payment Method
1.4.0 - 04/05/2023
- Improve architecture
- Improve security
- Improve webhook setup
1.3.0 - 06/04/2023
- Improve security
- Improve webhook setup
- Add more documentation references
1.2.9 - 07/03/2023
- Update endpoints
1.2.8 - 28/06/2022
- Improves on QRCode for email and checkout success
1.2.7 - 17/06/2022
- Improves on QRCode size on emails
1.2.6 - 17/06/2022
- Improves on order detail and order email
1.2.5 - 06/06/2022
- Implements the new feature of giftback
1.2.0 - 21/02/2022
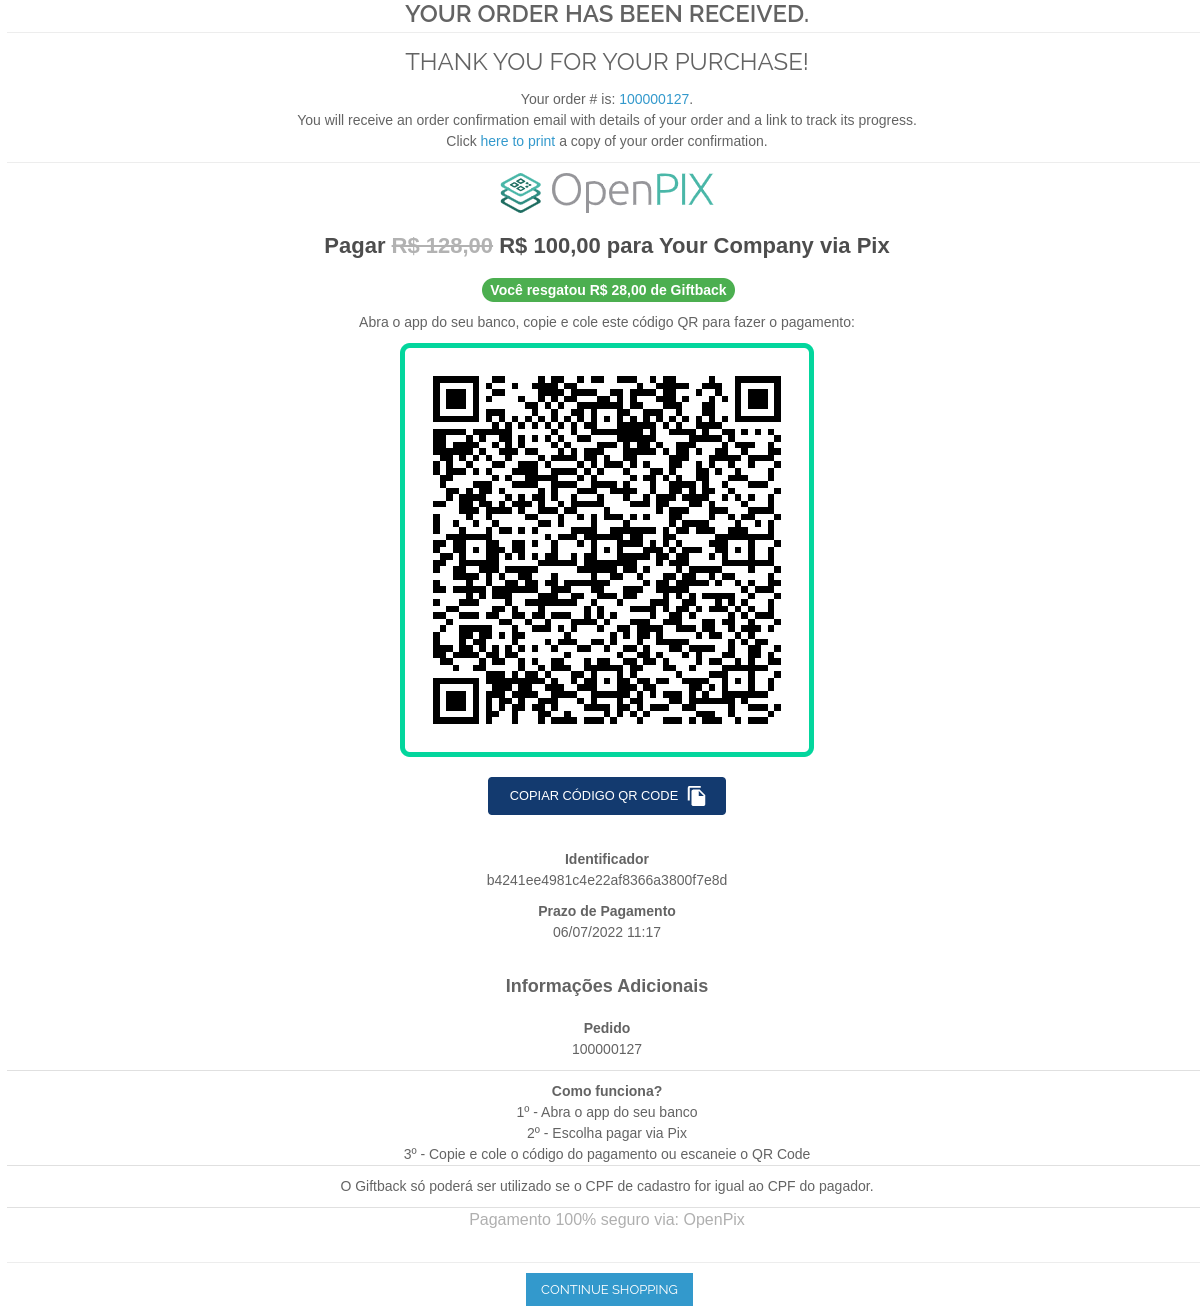
- Implements the new UI for checkout success when generating a new order
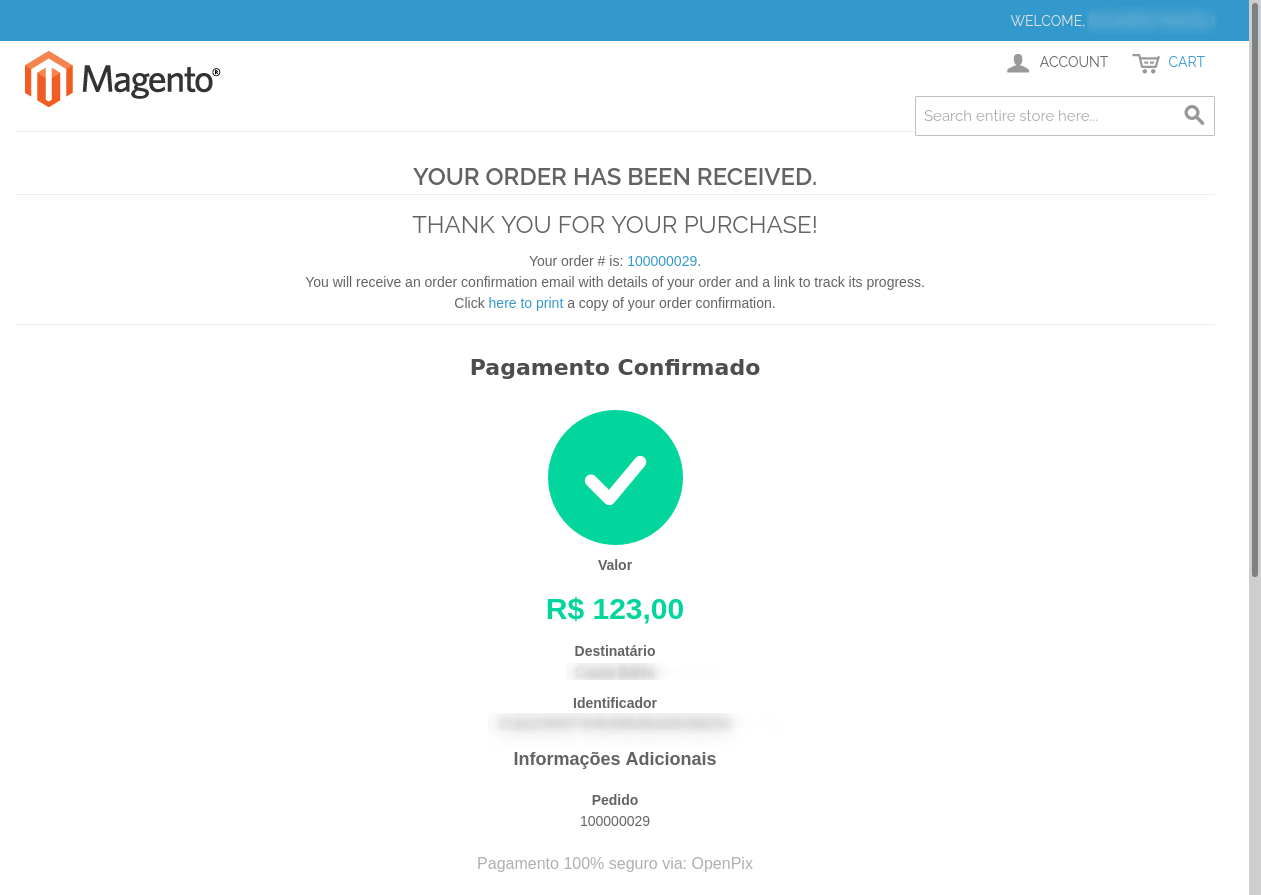
- Real-time inside of checkout success when paying the Order.
- When pay, the UI will update and will show that the order was paid.
1.1.5 - 12/11/2021
- OrderId added on Charge comment. Now will have "Store Name#123456"
1.1.4 - 08/11/2021
- OrderId added on OpenPix Charge additional info
1.1.3 - 19/10/2021
- Improves for Webhook Auth to avoid Apache blocking authorization header
1.1.2 - 17/09/2021
- Fix Typo on Success page for the line "Confirme as informações e finalize o pagamento."
- Fix Email to send the Qr Code Image and the Pix Br Code
- Improve for logs when generating a new order
1.1.1 - 16/09/2021
- Improves for Payment Title
- Improves for Webhook Validation. If webhook accuses an invalid header authorization, it will log on
~/var/log/openpix_webhooks.loga message with information. - Improves for Webhook Validation. If webhook accuses an invalid header authorization, it will return a json like:
{
  "error": "Invalid Request",
  "description": "Invalid authorization header: magent",
  "field": "authorization header"
}
1.1.0 - 06/09/2021
- New Button to select which status the order must be created
1.0.8 - 02/09/2021
- Improves for customer CPF/CNPJ
1.0.7 - 02/09/2021
- Sending platform plugin info on request header: magento plugin version, platform name
- Validation for customer CPF/CNPJ
1.0.6 - 02/09/2021
- Improves Customer Order Email: sending safe info
- Minor updates
1.0.5 - 16/08/2021
- Improves Invoice Email
- Minor updates
1.0.4 - 28/07/2021
- Add validation for Customer phone
- Minor updates
1.0.3 - 26/07/2021
- Customer improves: saving more fields on OpenPix platform
- Minor updates for customer
1.0.2 - 26/07/2021
- Improve for comment characters length
- Minor updates
1.0.1 - 01/07/2021
- Minor updates
1.0.0 - 01/06/2021
- Initial Version
Extract the contents of the .zip file and paste it into the root folder of your Magento1 store. Usually the root store is named src which references source. If your store is different, look for the folder that contains other folders like:
- app
- js
- lib
- skin
- var
As in the example below:
Finding the folder that contains those mentioned, just do the following:
- Copy the extracted .zip files;
- Paste into this folder
2. Configuring Magento1 Plugin
Enter Magento1 Admin -> System > Configuration > Sales (side menu) > Payment Methods
Upon accessing Payment Methods you will notice the Collapsible OpenPix - Pix
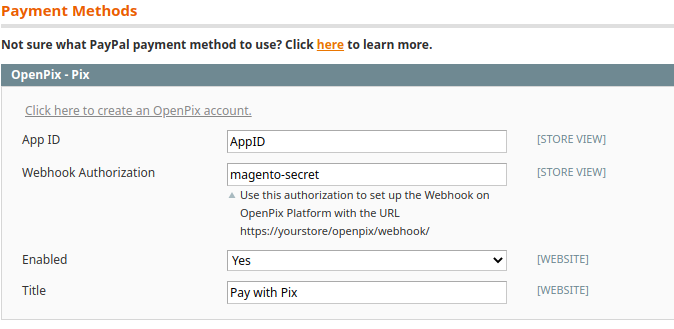
- App ID Insert AppID or Register a Plugin-type AppID. Create an appID here
- Webhook Authorization Create a password for the Webhook integration. Webhook is required to update the status of Orders in real time when the Pix charge is paid.
- Remember: The URL to be used in the webhook must be:
https://yourstore/openpix/webhookwhen you register it on the OpenPix platform - Remember: The key you use here must be the same at the time you register it on the OpenPix platform.
- Create a Webhook here.
- Remember: The URL to be used in the webhook must be:
- Enabled Enable/Disable the plugin as a payment method
- Title Payment method title in your Magento1 store
2.2 Configuring CPF/CNPJ for Customer (optional)
To save the customer's cpf/cnpj of the order in your OpenPix collection you need to activate the TaxVat field in your Magento store.
Note: If you go without the configuration of this field, your charges will be saved without the same customer.
Enter Magento1 Admin -> System > Configuration > Customers (side menu) > Customer Configuration
In Show Tax/VAT Number select the required value:
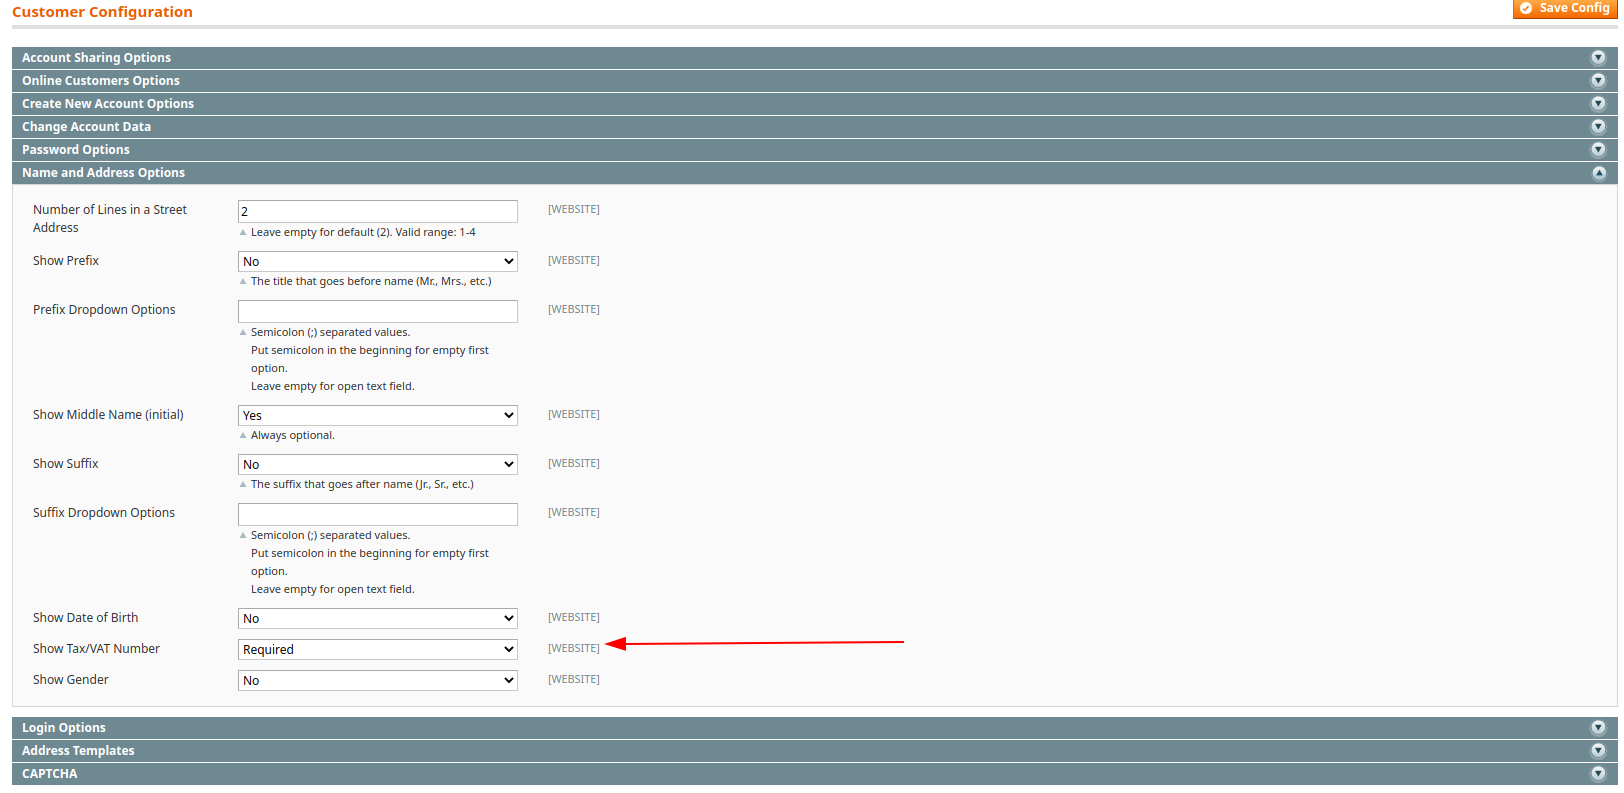
From now on, customers will have to fill in this field with their CPF or CNPJ and it will be used to save the customer on the OpenPix platform.
3. Create the Webhook within the OpenPix Platform
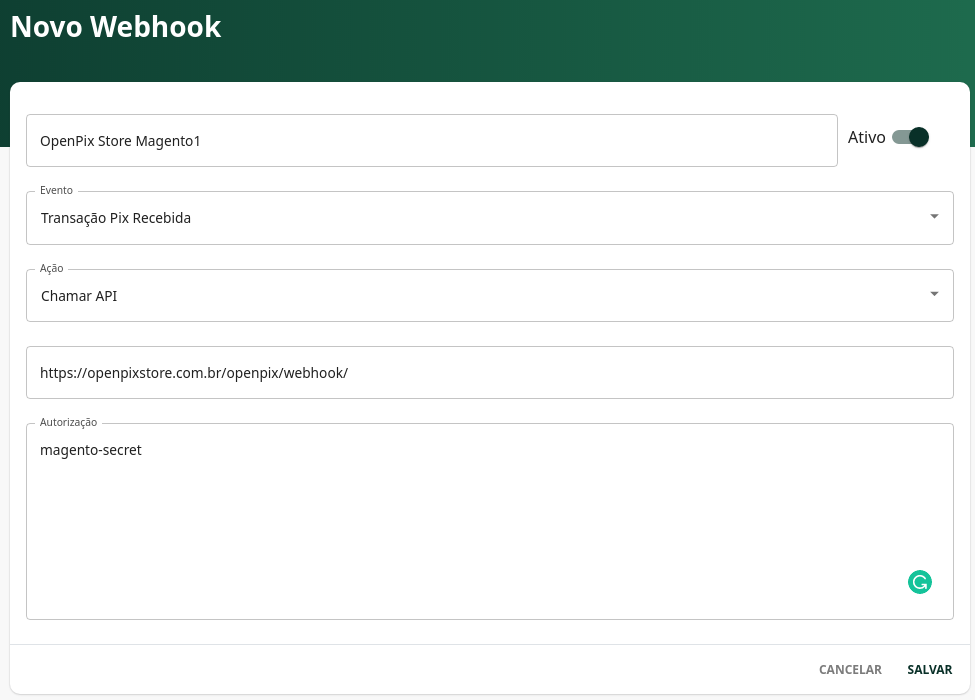
Register the Webhook who will be responsible for updating your Magento1 store when a Pix charge is paid.
To register a new Webhook follow the steps below:
- Go to the OpenPix platform and access: Admin -> Settings -> API/Plugins -> New Webhook
- Use the same password registered in your Magento1 store. Webhook is required to update the status of Orders in real time when the Pix charge is paid.
- The Callback URL that must be used in the registration is found right below the field where the webhook password is registered within your Magento1 store. The default is:
https://yourstore/openpix/webhook
4. Place Order with Pix
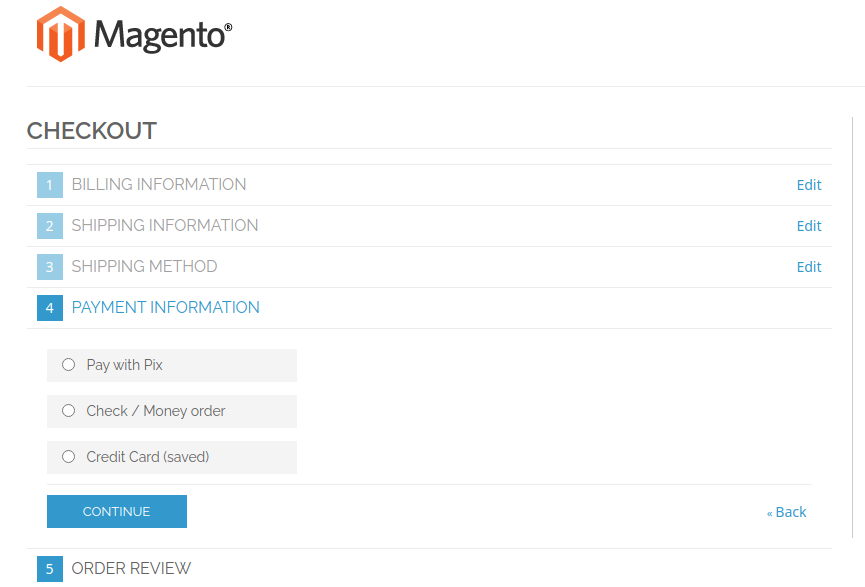
Choose the option to pay the order using Pix
Pay Pix using your bank's app.

Validate Order status changed after payment
Expiration
OpenPix will handle Pix Charge expiration. However, it is necessary to configure the expiration of the order in your magento store, as it will take care of the entire process.
However, magento1 does not have a native solution for it.
We recommend that order expiration/cancellation in magento1 be done using a third-party lib for help.
Once you have the third lib, we indicate that a similar configuration below is followed:
- OpenPix billing expiration time: 15 minutes
- put the same 15 minutes inside your Magento store.
In magento you can use the lib below or any of your preference:
Updating the plugin
We advise OpenPix customers to always be up to date with the latest version of the plugin. You can identify it in the installation step.
If your plugin is out of date, just follow the steps of the same installation step and update the plugin files in your ecommerce.
Debug
To debug the OpenPix plugin we have two files and both files you can find on var/log:
openpix_exception.log: file that concentrates logs referring to the process of creating a new Magento order and consequently the charge on the OpenPix sideopenpix_webhooks.log: file that gathers logs referring to the payment process of an order. The webhook is called when we identify a new Pix in your account and it takes care of updating the order status in your Magento store.
